

Prerequisites
- A Linux server (Ubuntu/Debian or RHEL/CentOS/Amazon Linux)
- A Capsule account — sign up free
- One of: PostgreSQL, MySQL, or MongoDB already running on the server (or in Docker)
Commands in this guide that are prefixed with
sudo require root privileges. If you are already running as root, omit the sudo prefix.Step 1 — Install the agent
SSH into your server and run the install script:/usr/local/bin/capsule.
Step 2 — Authenticate
Now you’ll connect the agent you just installed to your Capsule account, using a license key. Don’t have an account yet? Sign up free — you’ll land on the Setup page automatically after signup. 1. Get your license key Open the Setup page in your dashboard. Your license key is shown under Your License Key — click Copy to copy it to your clipboard.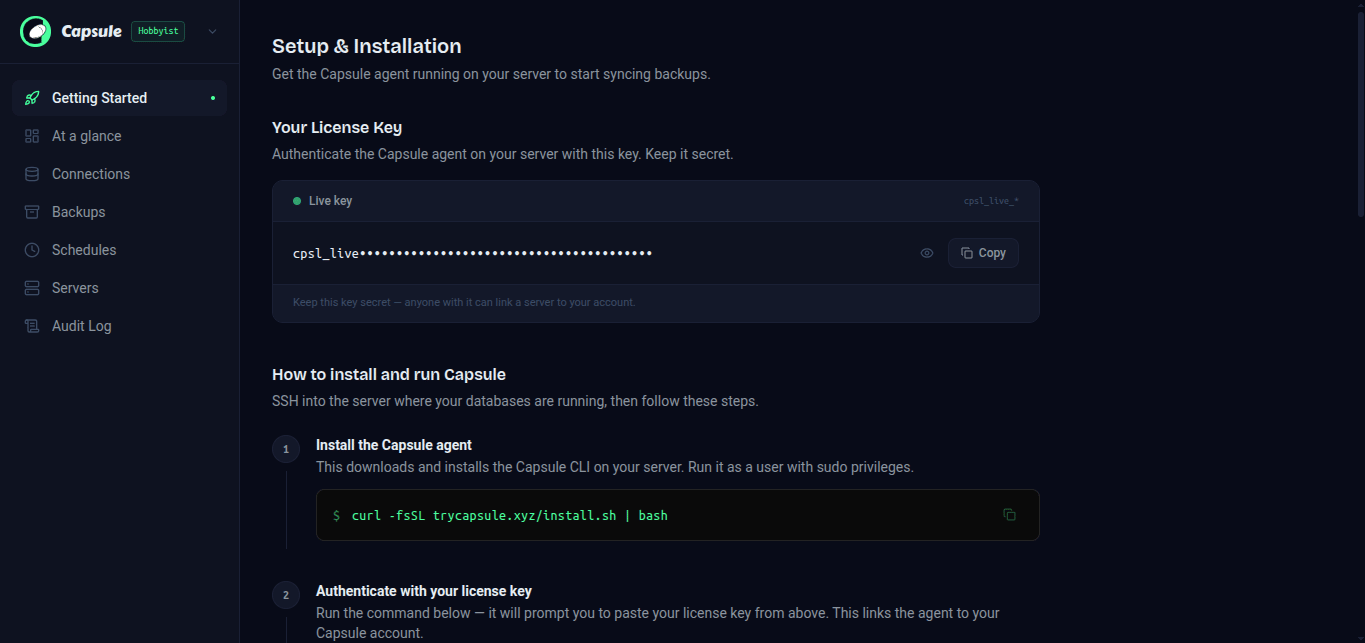
cpsl_live_) and press Enter. The key will appear on screen as you paste it — that’s normal for this prompt, it’s not hidden like a password.
If it worked, you’ll see:
Setting this server up to replace one you’re decommissioning? Plain
capsule auth generates a new encryption key — it cannot decrypt backups taken by the old server. If you have existing backups you still need, don’t continue past this step yet: go back to the old server, run capsule key show, and save that key somewhere safe. Then here, run capsule auth --restore instead of capsule auth — it prompts for both your license key and the saved encryption key, so this new server can read everything the old one ever backed up. Full walkthrough: capsule auth — disaster recovery and migrating to a new server.capsule auth just generated a brand-new encryption key for this server — every backup from here on is encrypted with it, and Capsule never stores a copy anywhere. If this server is lost, wiped, or decommissioned later without this key saved somewhere else, every backup it ever took becomes permanently unreadable — not even Capsule can recover it. Do this now, while it’s front of mind, rather than after something’s already gone wrong:
capsule key for exactly what this does and how to store it safely.
Step 3 — Install database tools
Capsule uses native database tools (pg_dump, mysqldump, mongodump) to create backups. Install the ones you need:
- PostgreSQL
- MySQL
- MongoDB
✓ before continuing.
Step 4 — Add a database connection
Launch the Capsule TUI (interactive terminal menu):Step 5 — Run as a background service
Install Capsule as a systemd service so it runs automatically and restarts on reboot:Step 6 — Schedule your first backup
Set up an automatic backup schedule for your connection, passing the connection’s label and a cron expression:0 2 * * * means “every day at 2 AM” — see the capsule schedule reference for more cron examples, or use crontab.guru to build your own.
There’s no separate setting for how many backups to keep — that’s controlled entirely by your plan’s retention period (e.g. 10 days on Solo, 30 on Pro). See How backups are stored for the exact numbers per plan.
Once the schedule is saved, your first backup will run at the next scheduled time. You can also trigger one immediately from the dashboard:
Next steps
Backup & Restore
Trigger on-demand backups and restore from the CLI or dashboard.
CLI reference
See all available commands and options.