> ## Documentation Index
> Fetch the complete documentation index at: https://doc.trycapsule.xyz/llms.txt
> Use this file to discover all available pages before exploring further.
# Quickstart
> Install Capsule and back up your first database in under 5 minutes.
## Prerequisites
* A Linux server (Ubuntu/Debian or RHEL/CentOS/Amazon Linux)
* A Capsule account — [sign up free](https://trycapsule.xyz/signup)
* One of: PostgreSQL, MySQL, or MongoDB **already running** on the server (or in Docker)
Commands in this guide that are prefixed with `sudo` require root privileges. If you are already running as root, omit the `sudo` prefix.
***
## Step 1 — Install the agent
SSH into your server and run the install script:
```bash theme={null}
curl -fsSL trycapsule.xyz/install.sh | bash
```
This downloads the latest Capsule binary, verifies its checksum, and installs it to `/usr/local/bin/capsule`.
***
## Step 2 — Authenticate
Now you'll connect the agent you just installed to your Capsule account, using a license key.
Don't have an account yet? [Sign up free](https://trycapsule.xyz/signup) — you'll land on the Setup page automatically after signup.
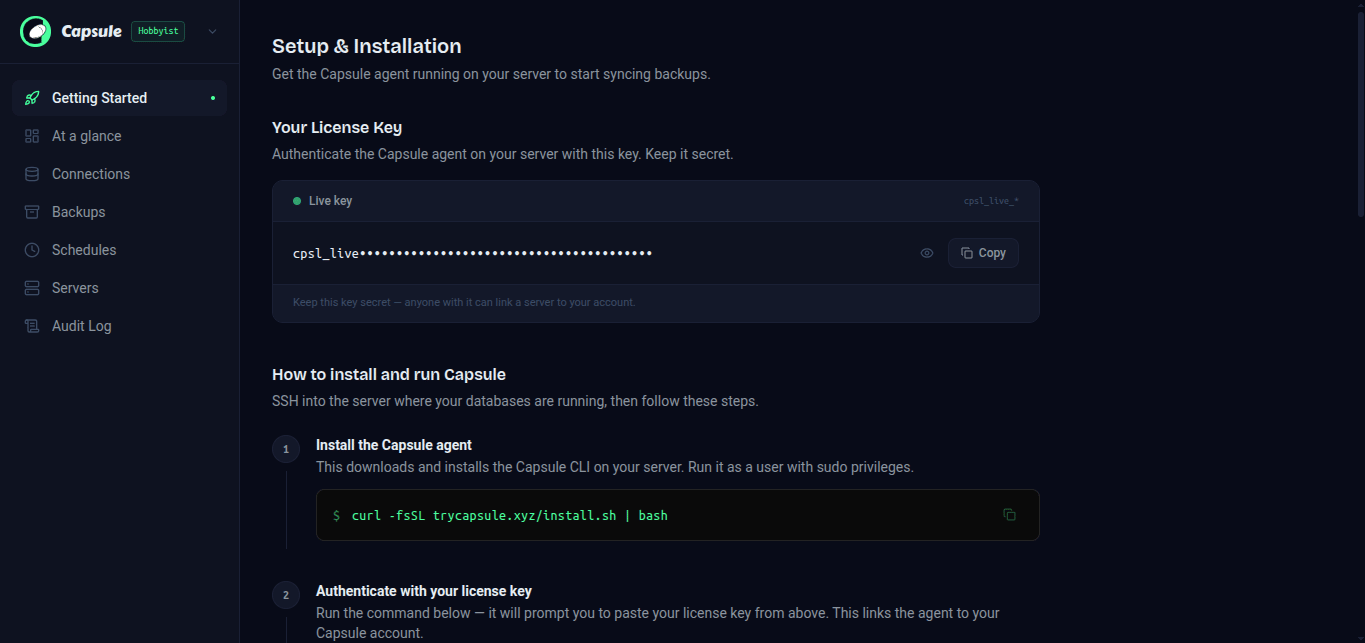
**1. Get your license key**
Open the [Setup page](https://trycapsule.xyz/dashboard/setup) in your dashboard. Your license key is shown under **Your License Key** — click **Copy** to copy it to your clipboard.
 **2. Paste it into the terminal**
Back in your server's terminal (the same SSH session from Step 1), run:
```bash theme={null}
capsule auth
```
This will print a prompt asking you to enter your license key:
```
Enter your Capsule license key:
```
Paste the key you copied (it starts with `cpsl_live_`) and press **Enter**. The key will appear on screen as you paste it — that's normal for this prompt, it's not hidden like a password.
If it worked, you'll see:
```
License key saved and verified.
```
Your server is now linked to your Capsule account.
Keep your license key secret — anyone with it can link a server to your account.
**Setting this server up to replace one you're decommissioning?** Plain `capsule auth` generates a **new** encryption key — it cannot decrypt backups taken by the old server. If you have existing backups you still need, don't continue past this step yet: go back to the old server, run `capsule key show`, and save that key somewhere safe. Then here, run `capsule auth --restore` instead of `capsule auth` — it prompts for both your license key and the saved encryption key, so this new server can read everything the old one ever backed up. Full walkthrough: [`capsule auth` — disaster recovery](/cli/auth#disaster-recovery) and [migrating to a new server](/cli/backup-restore#migrating-to-a-new-server-decommissioning-the-old-one).
**3. Save your encryption key, now, before you forget**
`capsule auth` just generated a brand-new encryption key for this server — every backup from here on is encrypted with it, and Capsule never stores a copy anywhere. If this server is lost, wiped, or decommissioned later without this key saved somewhere else, every backup it ever took becomes permanently unreadable — not even Capsule can recover it. Do this now, while it's front of mind, rather than after something's already gone wrong:
```bash theme={null}
capsule key show
```
Copy the 64-character key it prints into a password manager or secrets vault. See [`capsule key`](/cli/key) for exactly what this does and how to store it safely.
***
## Step 3 — Install database tools
Capsule uses native database tools (`pg_dump`, `mysqldump`, `mongodump`) to create backups. Install the ones you need:
```bash theme={null}
# Debian / Ubuntu
sudo apt-get install postgresql-client
# RHEL / CentOS / Amazon Linux
sudo dnf install postgresql
```
```bash theme={null}
# Debian / Ubuntu
sudo apt-get install mysql-client
# RHEL / CentOS / Amazon Linux
sudo dnf install mysql
```
MongoDB tools are not in the default system package repos. You need to add the official MongoDB repository first.
**Debian / Ubuntu**
```bash theme={null}
# Import GPG key
curl -fsSL https://www.mongodb.org/static/pgp/server-8.0.asc \
| sudo gpg --dearmor -o /usr/share/keyrings/mongodb-server-8.0.gpg
# Add repo (auto-detects your Ubuntu/Debian codename)
echo "deb [ arch=amd64,arm64 signed-by=/usr/share/keyrings/mongodb-server-8.0.gpg ] \
https://repo.mongodb.org/apt/ubuntu \
$(. /etc/os-release && echo $VERSION_CODENAME)/mongodb-org/8.0 multiverse" \
| sudo tee /etc/apt/sources.list.d/mongodb-org-8.0.list
# Install
sudo apt-get update && sudo apt-get install -y mongodb-database-tools mongosh
```
**RHEL / CentOS / Amazon Linux**
```bash theme={null}
# Add repo
sudo tee /etc/yum.repos.d/mongodb-org-8.0.repo << 'EOF'
[mongodb-org-8.0]
name=MongoDB Repository
baseurl=https://repo.mongodb.org/yum/redhat/$releasever/mongodb-org/8.0/x86_64/
gpgcheck=1
enabled=1
gpgkey=https://www.mongodb.org/static/pgp/server-8.0.asc
EOF
# Install
sudo dnf install -y mongodb-database-tools mongosh
```
Do **not** use `sudo apt-get install mongodb-database-tools` without first adding the repo above — the package will not be found. Do **not** use `brew install` on Linux — it installs macOS binaries that fail with an exec format error.
Verify everything is ready:
```bash theme={null}
capsule doctor
```
All required tools should show `✓` before continuing.
***
## Step 4 — Add a database connection
Launch the Capsule TUI (interactive terminal menu):
```bash theme={null}
capsule
```
An interactive menu appears. Select **Manage Connections → Add Connection**, choose your database type, and enter the host, port, name, username, and password. Capsule tests the connection live before saving.
**TUI keyboard shortcuts**
| Key | Action |
| --------- | ------------------------------------------ |
| `↑` / `↓` | Navigate |
| `Enter` | Select |
| `N` | New connection (on the connections screen) |
| `E` | Edit selected connection |
| `D` | Delete selected connection |
| `CTRL+R` | Refresh your plan — see below |
| `ESC` | Go back |
**When to use `CTRL+R`**
Capsule caches your plan locally for 30 minutes to avoid a network round-trip on every command. This means features unlocked by an upgrade (like scheduled backups) may not appear in the TUI immediately.
Press `CTRL+R` to force a fresh plan fetch from the server in these situations:
* You just upgraded or downgraded your plan and want the change to take effect right away
* A feature you expect to see (e.g. the Schedule option) isn't showing up yet
***
## Step 5 — Run as a background service
Install Capsule as a systemd service so it runs automatically and restarts on reboot:
```bash theme={null}
sudo capsule install-service
```
Your agent is now running in the background.
***
## Step 6 — Schedule your first backup
Set up an automatic backup schedule for your connection, passing the connection's label and a cron expression:
```bash theme={null}
capsule schedule add --connection --cron "0 2 * * *"
```
`0 2 * * *` means "every day at 2 AM" — see the [capsule schedule](/cli/schedule#cron-expression-examples) reference for more cron examples, or use [crontab.guru](https://crontab.guru) to build your own.
There's no separate setting for how many backups to keep — that's controlled entirely by your plan's retention period (e.g. 10 days on Solo, 30 on Pro). See [How backups are stored](/cli/backup-restore#how-backups-are-stored) for the exact numbers per plan.
Once the schedule is saved, your first backup will run at the next scheduled time. You can also trigger one immediately from the dashboard:
```bash theme={null}
capsule
```
Navigate to your connection → **Backup now**.
Your backup history and connection status will appear in your [dashboard](https://trycapsule.xyz/dashboard) within a few minutes of the first backup completing.
***
## Next steps
Trigger on-demand backups and restore from the CLI or dashboard.
See all available commands and options.
**2. Paste it into the terminal**
Back in your server's terminal (the same SSH session from Step 1), run:
```bash theme={null}
capsule auth
```
This will print a prompt asking you to enter your license key:
```
Enter your Capsule license key:
```
Paste the key you copied (it starts with `cpsl_live_`) and press **Enter**. The key will appear on screen as you paste it — that's normal for this prompt, it's not hidden like a password.
If it worked, you'll see:
```
License key saved and verified.
```
Your server is now linked to your Capsule account.
Keep your license key secret — anyone with it can link a server to your account.
**Setting this server up to replace one you're decommissioning?** Plain `capsule auth` generates a **new** encryption key — it cannot decrypt backups taken by the old server. If you have existing backups you still need, don't continue past this step yet: go back to the old server, run `capsule key show`, and save that key somewhere safe. Then here, run `capsule auth --restore` instead of `capsule auth` — it prompts for both your license key and the saved encryption key, so this new server can read everything the old one ever backed up. Full walkthrough: [`capsule auth` — disaster recovery](/cli/auth#disaster-recovery) and [migrating to a new server](/cli/backup-restore#migrating-to-a-new-server-decommissioning-the-old-one).
**3. Save your encryption key, now, before you forget**
`capsule auth` just generated a brand-new encryption key for this server — every backup from here on is encrypted with it, and Capsule never stores a copy anywhere. If this server is lost, wiped, or decommissioned later without this key saved somewhere else, every backup it ever took becomes permanently unreadable — not even Capsule can recover it. Do this now, while it's front of mind, rather than after something's already gone wrong:
```bash theme={null}
capsule key show
```
Copy the 64-character key it prints into a password manager or secrets vault. See [`capsule key`](/cli/key) for exactly what this does and how to store it safely.
***
## Step 3 — Install database tools
Capsule uses native database tools (`pg_dump`, `mysqldump`, `mongodump`) to create backups. Install the ones you need:
```bash theme={null}
# Debian / Ubuntu
sudo apt-get install postgresql-client
# RHEL / CentOS / Amazon Linux
sudo dnf install postgresql
```
```bash theme={null}
# Debian / Ubuntu
sudo apt-get install mysql-client
# RHEL / CentOS / Amazon Linux
sudo dnf install mysql
```
MongoDB tools are not in the default system package repos. You need to add the official MongoDB repository first.
**Debian / Ubuntu**
```bash theme={null}
# Import GPG key
curl -fsSL https://www.mongodb.org/static/pgp/server-8.0.asc \
| sudo gpg --dearmor -o /usr/share/keyrings/mongodb-server-8.0.gpg
# Add repo (auto-detects your Ubuntu/Debian codename)
echo "deb [ arch=amd64,arm64 signed-by=/usr/share/keyrings/mongodb-server-8.0.gpg ] \
https://repo.mongodb.org/apt/ubuntu \
$(. /etc/os-release && echo $VERSION_CODENAME)/mongodb-org/8.0 multiverse" \
| sudo tee /etc/apt/sources.list.d/mongodb-org-8.0.list
# Install
sudo apt-get update && sudo apt-get install -y mongodb-database-tools mongosh
```
**RHEL / CentOS / Amazon Linux**
```bash theme={null}
# Add repo
sudo tee /etc/yum.repos.d/mongodb-org-8.0.repo << 'EOF'
[mongodb-org-8.0]
name=MongoDB Repository
baseurl=https://repo.mongodb.org/yum/redhat/$releasever/mongodb-org/8.0/x86_64/
gpgcheck=1
enabled=1
gpgkey=https://www.mongodb.org/static/pgp/server-8.0.asc
EOF
# Install
sudo dnf install -y mongodb-database-tools mongosh
```
Do **not** use `sudo apt-get install mongodb-database-tools` without first adding the repo above — the package will not be found. Do **not** use `brew install` on Linux — it installs macOS binaries that fail with an exec format error.
Verify everything is ready:
```bash theme={null}
capsule doctor
```
All required tools should show `✓` before continuing.
***
## Step 4 — Add a database connection
Launch the Capsule TUI (interactive terminal menu):
```bash theme={null}
capsule
```
An interactive menu appears. Select **Manage Connections → Add Connection**, choose your database type, and enter the host, port, name, username, and password. Capsule tests the connection live before saving.
**TUI keyboard shortcuts**
| Key | Action |
| --------- | ------------------------------------------ |
| `↑` / `↓` | Navigate |
| `Enter` | Select |
| `N` | New connection (on the connections screen) |
| `E` | Edit selected connection |
| `D` | Delete selected connection |
| `CTRL+R` | Refresh your plan — see below |
| `ESC` | Go back |
**When to use `CTRL+R`**
Capsule caches your plan locally for 30 minutes to avoid a network round-trip on every command. This means features unlocked by an upgrade (like scheduled backups) may not appear in the TUI immediately.
Press `CTRL+R` to force a fresh plan fetch from the server in these situations:
* You just upgraded or downgraded your plan and want the change to take effect right away
* A feature you expect to see (e.g. the Schedule option) isn't showing up yet
***
## Step 5 — Run as a background service
Install Capsule as a systemd service so it runs automatically and restarts on reboot:
```bash theme={null}
sudo capsule install-service
```
Your agent is now running in the background.
***
## Step 6 — Schedule your first backup
Set up an automatic backup schedule for your connection, passing the connection's label and a cron expression:
```bash theme={null}
capsule schedule add --connection --cron "0 2 * * *"
```
`0 2 * * *` means "every day at 2 AM" — see the [capsule schedule](/cli/schedule#cron-expression-examples) reference for more cron examples, or use [crontab.guru](https://crontab.guru) to build your own.
There's no separate setting for how many backups to keep — that's controlled entirely by your plan's retention period (e.g. 10 days on Solo, 30 on Pro). See [How backups are stored](/cli/backup-restore#how-backups-are-stored) for the exact numbers per plan.
Once the schedule is saved, your first backup will run at the next scheduled time. You can also trigger one immediately from the dashboard:
```bash theme={null}
capsule
```
Navigate to your connection → **Backup now**.
Your backup history and connection status will appear in your [dashboard](https://trycapsule.xyz/dashboard) within a few minutes of the first backup completing.
***
## Next steps
Trigger on-demand backups and restore from the CLI or dashboard.
See all available commands and options.